User-Behavior Driven XCUITests
Unlike unit tests that target specific components, UITests serve as integrated tests over the app and follow the same steps as users to identify if the flow formed by all the components works as expected. It then becomes crucial to have UITests simple to write, easy to read, and, if possible, enjoyable to maintain.
In this article, a user-behavior driven pattern is proposed, in which the testing code is described by a series of user actions that will be translated into real XCUIElement interactions under the hood. Such pattern is clear and straightforward enough, from my experience of my last job, for QA engineers who might not be iOS specialists to even take over the tests with less pain, and let real iOS experts focus on something else bigger.
The article consists of:
- A real-world example of a smelly test
- Improve the test in the user-behavior driven pattern
- Simplify the pattern further with extended actions
- Bonus: Decouple the basic actions from XCUIElement
Example: A Native Test
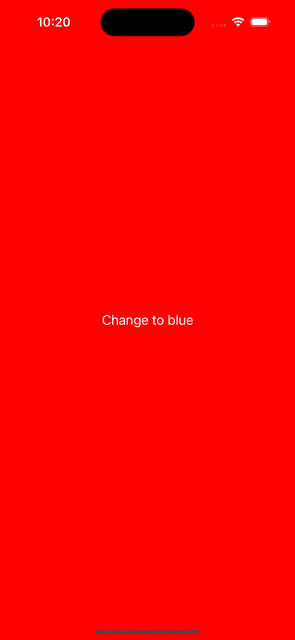
Suppose we have a simple app where we can tap the login button, fill in the form and submit, and eventually see the welcome message:

To test the user flow with the native XCTest framework, the automated UI test could look like:
import XCTest

final class ExampleUITests: XCTestCase {
  func testExample() throws {
    self.continueAfterFailure = false

    let app = XCUIApplication()
    app.launch()
    XCTAssertTrue(app.buttons["Log In"].waitForExistence(timeout: 1))
    app.buttons["Log In"].tap()
    XCTAssertTrue(app.staticTexts["Enter You Information"].waitForExistence(timeout: 1))
    app.textFields["account"].tap()
    app.textFields["account"].typeText("P.S@g.com")
    app.secureTextFields["password"].tap()
    app.secureTextFields["password"].typeText("888888")
    app.buttons["Submit"].tap()
    XCTAssertTrue(app.alerts["Incorrect"].waitForExistence(timeout: 1))
    app.alerts.buttons["OK"].tap()
    app.secureTextFields["password"].tap()
    app.secureTextFields["password"].typeText("000000")
    app.buttons["Submit"].tap()
    XCTAssertFalse(app.staticTexts["Enter You Information"].waitForExistence(timeout: 1))
    XCTAssertEqual(app.staticTexts["welcome.label"].label, "Welcome Back, P.S@g.com!")
  }
}
This, well, does not look attractive. Possibly for several reasons:
- Poor Code Reusability: Not easily reusable without copying and pasting segments of code if we’re writing more tests around the same screens.
- High UI Dependence: Highly coupled with specific XCUIElement, meaning any changes to the UI could easily break the test.
- Low Readability: Understanding what happens in the tests can be difficult. The specifics of the steps aren’t immediately related to the intention.
- Limited Scalability: As tests grow in complexity and number, this approach can become increasingly harder to manage and extend.
What if we make the testing code more humanly understandable?
Test In User-Behavior Driven Pattern
Recall that UITests are designed to mimic how user will interact with the app. Let’s try serializing the interactions into a series of actions on associated elements.
import XCTest

final class ExampleUserBehaviorDrivenUITests: XCTestCase {
  func testExampleUserBehaviorDriven() throws {
    self.continueAfterFailure = false

    then(.launch)
    then(.wait(for: .landingScreen(.this), to: .appear))
    then(.tap(on: .landingScreen(.loginButton)))
    then(.wait(for: .loginScreen(.this), to: .appear))
    then(.tapToEnter("P.S@g.com", on: .loginScreen(.accountField)))
    then(.tapToEnter("888888", on: .loginScreen(.passwordField)))
    then(.tap(on: .loginScreen(.submitButton)))
    then(.wait(for: .loginScreen(.alert(.incorrect)), to: .appear))
    then(.tap(on: .loginScreen(.alert(.okButton))))
    then(.tapToEnter("000000", on: .loginScreen(.passwordField)))
    then(.tap(on: .loginScreen(.submitButton)))
    then(.wait(for: .loginScreen(.this), to: .disappear))
    then(.wait(for: .landingScreen(.welcome), to: .haveValue("Welcome back, P.S@g.com!")))
  }
}
See, much more human, isn’t it? It looks more intuitive because it’s exactly how a user interacts with the app — taps on X, enters Y, and waits for Z. To make the magic work, we need to interpret the element under the hood:
// MARK: - Element
enum ExampleElement {
  case landingScreen(LandingScreenElement)
  enum LandingScreenElement {
    case this
    case loginButton
    case welcome
  }

  case loginScreen(LoginScreenElement)
  enum LoginScreenElement {
    case this
    case accountField
    case passwordField
    case submitButton

    case alert(AlertElement)
    enum AlertElement {
      case incorrect
      case okButton
    }
  }
}

// MARK: - Element resolvers
// Translate the elements into XCUIElement - what XCTest recognizes.
extension ExampleElement {
  func resolve() -> XCUIElement {
    let app = XCUIApplication()
    switch self{
    case .landingScreen(.this):
      return app.buttons["Log In"]

    case .landingScreen(.loginButton):
      return app.buttons["Log In"]

    case .landingScreen(.welcome):
      return app.staticTexts["welcome.label"]

    case .loginScreen(.this):
      return app.staticTexts["Enter You Information"]

    case .loginScreen(.accountField):
      return app.textFields["account"]

    case .loginScreen(.passwordField):
      return app.secureTextFields["password"]

    case .loginScreen(.submitButton):
      return app.buttons["Submit"]

    case .loginScreen(.alert(.incorrect)):
      return app.alerts["Incorrect"]

    case .loginScreen(.alert(.okButton)):
      return app.alerts.buttons["OK"]
    }
  }
}
and define the handler of the basic actions:
// MARK: - Basic action
enum BasicAction<Element> {
  case launch

  case wait(for: Element, to: State)
  enum State {
    case appear
    case disappear
    case haveValue(String)
  }

  case tap(on: Element)
  case tapToEnter(String, on: Element)
}

// MARK: - Basic action handlers
extension XCTestCase {
  func then(_ action: BasicAction<ExampleElement>) {
    let app = XCUIApplication()
    switch action {
    case .launch:
      app.launch()

    case let .wait(for: ele, to: .appear):
      XCTAssertTrue(ele.resolve().waitForExistence(timeout: 1))

    case let .wait(for: ele, to: .disappear):
      XCTAssertFalse(ele.resolve().waitForExistence(timeout: 1))

    case let .wait(for: ele, to: .haveValue(value)):
      XCTAssertEqual(ele.resolve().label, value)

    case let .tap(ele):
      ele.resolve().tap()

    case let .tapToEnter(text, ele):
      ele.resolve().tap()
      ele.resolve().typeText(text)
    }
  }
}
Some highlights of this pattern:
- Increased maintainability: Thanks to the enum structure, you can write a test quickly with auto-completion to reuse what were previously defined. Available actions and elements are well organized, and a new action or element can be added seamlessly.
- Reduced UI Dependence: The test is composed of user actions but not XCUIElement interactions, which means updates to the internal XCUIElement implementation does not change the test itself.
- Enhanced Readability: When writing a test, you’re focusing on what to do instead of how. The actual implementation is wrapped up in a descriptive and human-readable format.
Extended Actions To Streamline More
We just defined the basic actions. However, some consecutive actions in a particular screen could be also common. For instance, in the login screen, user always has to tap the text fields to enter the account and the password, followed by hitting the submit button in order to proceed.
To make common action series reusable, we can define ad-hoc actions for screens, whose handler is expected to comprise basic actions to achieve some strong intention.
// MARK: - Extended actions
enum ExampleAction {
  case landingScreen(LandingScreenAction)
  enum LandingScreenAction {
    case login(account: String, password: String)
  }

  case loginScreen(LoginScreenAction)
  enum LoginScreenAction {
    case login(account: String, password: String)
  }
}

// MARK: - Extended action handlers.
// Make use of basic actions to achieve some strong intention.
extension XCTestCase {
  func then(_ action: ExampleAction) {
    switch action {
    case let .landingScreen(.login(account, password)):
      then(.tap(on: .landingScreen(.loginButton)))
      then(.wait(for: .loginScreen(.this), to: .appear))
      then(.loginScreen(.login(account: account, password: password)))
      then(.wait(for: .loginScreen(.this), to: .disappear))

    case let .loginScreen(.login(account, password)):
      then(.tapToEnter(account, on: .loginScreen(.accountField)))
      then(.tapToEnter(password, on: .loginScreen(.passwordField)))
      then(.tap(on: .loginScreen(.submitButton)))
    }
  }
}
import XCTest
final class ExampleBehaviorDrivenUITests: XCTestCase {
func testScreenSpecificActions() throws {
self.continueAfterFailure = false
then(.launch)
then(.wait(for: .landingScreen(.this), to: .appear))
then(.landingScreen(.login(account: "P.S@g.com", password: "000000"))) // <-- one action for a complete intention
then(.wait(for: .landingScreen(.welcome), to: .haveValue("Welcome back, P.S@g.com!")))
}
}Looks great! Should be fair enough for us to start rewriting our tests!

Bonus: Decouple Action Handlers from XCUIElement
The basic actions resolve the element into XCUIElement and realize the intention. However, there could be some cases where we don’t want to follow the native XCUIElement behavior.
Take the former test for example. The element .welcome maps to the label “Welcome back, P.S@g.com!”, but I could be more interested in the account in the later half of the welcome message: “P.S@g.com”. I prefer a case .welcomeAccount that just refers to the account. But that won’t work if we are allowed just to refer to the whole label.
To enable such flexibility, we have to separate the element from the whole label; that is, to add an abstract element layer to prevent the basic action handlers from direct access to XCUIElement:
// MARK: - Resolved element
// Abstract element that defines how to perform a method or retrieve a property
struct ResolvedElement {
  let ele: XCUIElement
  let appears: () -> Bool
  let value: () -> String
  let tap: () -> Void
  let enter: (String) -> Void
}

// MARK: - Resolved element factory
// Creates an abstract element from XCUIElement.
// Each getter can be customized or use the default.
extension ResolvedElement {
  static func from(
    _ ele: XCUIElement,
    appears: @escaping (XCUIElement) -> Bool = { $0.waitForExistence(timeout: 1) },
    value: @escaping (XCUIElement) -> String = { $0.label },
    tap: @escaping (XCUIElement) -> Void = { $0.tap() },
    enter: @escaping (XCUIElement, String) -> Void => { $0.typeText($1) }
  ) -> ResolvedElement {
    return ResolvedElement(
      ele: ele,
      appears: { appears(ele) },
      value: { value(ele) },
      tap: { tap(ele) },
      enter: { enter(ele, $0) }
    )
  }
}
and rewrite the basic action handlers to deal with the abstract layer:
// MARK: - Basic action handlers
extension XCTestCase {
  func then(_ action: Action) {
    let app = XCUIApplication()
    switch action {
    case .launch:
      app.launch()

    case let .wait(for: ele, to: .appear):
      XCTAssertTrue(ele.resolve().appears())

    case let .wait(for: ele, to: .disappear):
      XCTAssertFalse(ele.resolve().appears())

    case let .wait(for: ele, to: .haveValue(value)):
      XCTAssertEqual(ele.resolve().value(), value)

    case let .tap(ele):
      ele.resolve().tap()

    case let .tapToEnter(text, ele):
      ele.resolve().tap()
      ele.resolve().enter(text)
    }
  }
}
Now we just let the element resolver return the abstract element layer. For most elements which follow the native XCUIElement, we call .from(...) to resolve them; for those with the need for some customized accessors, configure them with the arguments of the factory method:
// MARK: - Element
enum Element {
  // ...
  enum LandingScreenElement {
    // ...
    case welcome
    case welcomeAccount
    // ...
  }
  // ...
}

// MARK: - Element resolvers
// Translate the elements into ResolvedElement
extension XCTestCase {
  func resolve(_ ele: Element) -> ResolvedElement {
    let app = XCUIApplication()
    switch ele {
    // ...
    case .landingScreen(.welcome):
      return .from(app.staticTexts["welcome.label"])

    case .landingScreen(.welcomeAccount):
      return .from(app.staticTexts["welcome.label"],
                   value: { String($0.label.trimmingPrefix("Welcome back, ").dropLast()) }) // <-- customize the value extraction
    // ....
    }
  }
}
And finally, use it in the test:
final class ExampleBehaviorDrivenUITests: XCTestCase {
  func testScreenSpecificActions() throws {
    self.continueAfterFailure = false

    then(.launch)
    then(.wait(for: .landingScreen(.this), to: .appear))
    then(.landingScreen(.login(account: "P.S@g.com", password: "000000")))
    then(.wait(for: .landingScreen(.welcomeAccount), to: .haveValue("P.S@g.com"))) // <-- able to verify the account without the greeting!
  }
}
This way, the pattern becomes more flexible! Winner!
Conclusion
In this article, we introduced a user-behavior driven pattern for UITests, in which the test focuses on the user intentions, and the internal implementation of XCUIElement is wrapped up by the element and action enums. Such separation I believe keeps the test, from my experience, more joyful to maintain.
If this article helps you, please give me claps to let me know :-). Here is the framework UBDTestKit made based on this pattern, allowing you to directly apply to your project. Feel free to try it out!
![[iOS] How to Solve UIScrollView Constraint Ambiguity](https://miro.medium.com/v2/resize:fit:679/1*sqGvvO472SjlGvNduYsa3g.png)